Wednesday, February 19, 2014

Chinese Fighting Cupcakes


First post from the new kitchen! Before anything else, let’s all just gaze upon a photo of my beautiful baking cabinet:


I have so much counter space and I have space to store all my ingredients! It’s mind boggling! FYI, this does not make me any better at baking. During the unpacking process, I was flipping through the Cake Boss cookbook and I decided that it was time and I really wanted to try my hand at a piping bag. Buddy recommends starting with cupcakes to get some of the piping techniques down before advancing to cakes and that seemed fair to me. So begins a multistage process that leaves me with a mess and Chinese Fighting Cupcakes (a cupcake to anyone who understands this reference by the end of the post).

To start with, I (obviously) had to make some cupcakes. Now, I fully intended to be lazy here. I was working from home last week because Mother Nature decided it would be delightful to dump a heap of snow on us and I knew I had some box cake mix so I figured “the point of this is piping, not to make fancy cupcakes from scratch. Box cupcakes it is!” Unfortunately, the box cake I thought I had was actually brownie mix. And it was snowing. So I wasn't about to go out and buy some. No big deal though, I can make cupcakes like a pro from scratch. Here was my critical mistake though: I got lazy and didn't want to search for a recipe I knew worked well and just took the first recipe for chocolate cupcakes that popped up on the internets. BIG MISTAKE. Even though I’m a million percent sure I followed the recipe perfectly, these cupcakes did not turn out well. They were hard as rocks. Dense. Awful. Sadness. Now, I didn't actually find this out until we ate them but it was sad nonetheless. And before you even suggest it, I did not overcook the cupcakes. They were underbaked the first time I checked them and they were perfect 1 minute later when I took them out. It was just a bad recipe.

Ok, so enough ranting about the miserable cupcakes. More importantly, we’re talking about piping flowers. Turns out, I’m also bad at that. But we’ll get there in a minute. First I had to actually make some buttercream. I’m going to choose not to tell you how much butter and Crisco is in buttercream because it’ll only make you sad. I did love the 7.5 cups of powdered sugar that went into my mixer though. No matter what, that was always going to end in an explosion of white the second I turned the mixer on. So at approximately 7:30 in the morning, I mixed up my buttercream. This was largely uneventful besides the sugar volcano. Now, to make the flowers, I needed three colors. I decided to go with green grass and pink flowers with orange centers. Because that’s what the picture in the book did! So, first I mixed up my green. No matter what I tried and how much color gel I added, the buttercream wouldn't get any darker than a pastel green. After a while I gave up trying and just decided a light green would be fine. So I went in search of the decorating tip that Buddy recommended. Looking…looking…looking…nope. Don’t have it. Not cool people. So I picked one that looked flat-ish so I could make the flat circle of “grass” that was in the picture.

To do things properly, I even pulled out my cheap turntable/cake carrier that I bought ages ago so I could get used to using a turntable in conjunction with a piping bag. Let’s just say it took some time to get the hang of it. Getting the speed right was challenging and remembering not to move my hand was hard to do but eventually I was able to understand the mechanics of the process. There will be many pictures in this post of my triumphs and failures so here’s the first set with my range of green grass-layers:


Not great but not too bad, right? Passable? Oh, you just wait. Now I have to actually make flowers. That was just green circles, people! Child’s play! And that was already a challenge! For the flowers, I was supposed to use another tip that I absolutely did not have. No problem, I can improvise. However, none of the tips that I tried worked very well. They all made wavy patterns and none of them really looked like flower petals no matter how I tried. Oh yeah, and I had the same pastel pink issue as I did with the green except the pink looked even worse and was not at all vibrant. Anyway, I tried three different “types” of flowers but my conclusion is that they generally look like octopi, nonapi, jellyfish, or squished jellyfish. It was so sad.


On the bright side though, even though my creative piping skills leave something to be desired, I was able to consistently pipe things that were the same size, shape, and design. So I guess that’s something? Mechanically, I suppose I’m doing something right. I just may not have the creative eye. This should not surprise me at all. It probably shouldn't surprise you either at this point.

Last step was to add the orange centers. I know that the centers of flowers aren't typically orange but they’re whimsical so it’s ok. Or so I keep telling myself. And that’s what the picture had! Since I only have two piping bags, I had to wash one of them. Let me tell you something: buttercream is ridiculously hard to clean off hands, piping bags, utensils, or pretty much anything else. Cleaning a piping bag isn't easy in the best of situations and this was just crazy. It took me forever and then, as I’m looking at a still soaking wet piping bag, I decided that I could just use a Ziploc bag with the tip cut off. (Obviously, I had to clean all my stuff anyway but it was so annoying to have to do it in the middle of what I was working on.) Super annoyed at this point and thoroughly depressed by my ugly flowers, I piped in the middles. Which made them look worse. Seriously. I mean, you can see the pictures and decide but I think they look much worse with the orange. Mostly because the orange was barely orange. I really need to get this color mixing thing down better. Anyway, here’s the finished product:


So sad. And then to make everything worse, by the time I ate them, I discovered that they were dense and icky cupcakes. And to make everything worser, I had brought them over to my aunt’s for her birthday and they weren't good and I never like bringing something not good and inflicting it on other people. The only good part was the taste of the buttercream. Which was actually really good. My sister just ate that and decided to forgo the actual cupcake. Smart girl.

Well, first baking adventure out of the gate in a new kitchen and it’s basically a disaster. Sound familiar to anyone? Reminds me of the good ol’ days making cookie dough bites and pinwheel cookies. I think the key is that this was a recipe that really challenged me. And I need to keep challenging myself because well, it just makes for better stories. So until next time…

P.S. If you think of any baking challenges that you’d like to see me try, feel free to comment! There will most likely be a Tardis cake in my future sometime in August but I’m open to other ideas before then!

A Disney Moment: Dinosaur

This movie is THE WORST. Dinosaur is Black Cauldron bad. It’s Saludos Amigos bad. I can’t even explain how bad it is but it may in fact be the worst (so far). From the very first moment, it looked weird. A quick IMDB search informed us that the backgrounds are actually superimposed photos of tropical locations. Ok then. It’s not bad in theory but the technology wasn't quite there, I think. Or maybe it just looks bad because they superimposed the most detestable characters on the lovely backgrounds. The plot is basically Land Before Time (which is an excellent movie) but everything about this rendition falls flat. Aladar is a stupid name for a protagonist. Just sayin. And there are lemurs. For no reason that I understand. Let me explain the plot to you: there’s an asteroid and we have to go to the nesting grounds and we have to go there quickly or we’ll die. There’s a meaningless love story, an antagonist who was TOTALLY right, and a wandering aimlessness to the whole story. As far as the antagonist goes (and I will not refer to him as a villain), he saw a threat to his herd. He was the leader. It was a choice of either slow down for the old and sickly dinos and have everyone die or move on and wish the slow ones the best of luck. I’m sorry but if you’re talking about the survival of your species, you should probably just keep moving. Aladar and friends got lucky and found a cave to hide out in. A CAVE WITH STAIRS. Seriously, that cave has stone stairs. Few things have ever annoyed me so much in a movie. I was literally yelling at the screen. Ask my sister. And then Aladar is a really obnoxious know-it-all when he finally does catch up to the herd so why would anyone be listening to this guy they just met? The whole movie is fraught with implausibility. Worst. Worst. WORST. 5/5. If I could give it a negative score, I would. 

Wednesday, February 12, 2014

Try the Grey Stuff, It's Delicious!

Don't believe me? Ask the dishes! (You're welcome for getting that stuck in your head all day.) Life is finally calming down for the blogger! Isn't that exciting?!? Basically what that will mean is some more regularly scheduled baking! I just moved into a new house which has a kitchen to die for. It also has an oven that can currently only bake at 350 so will need to be replaced. Oops. However, this blog post isn't about baking in my new kitchen, it's about baking in my mom's new kitchen. There was a good amount of baking over the holidays but nothing that was noteworthy except for my very special birthday cupcakes. That I made for myself.

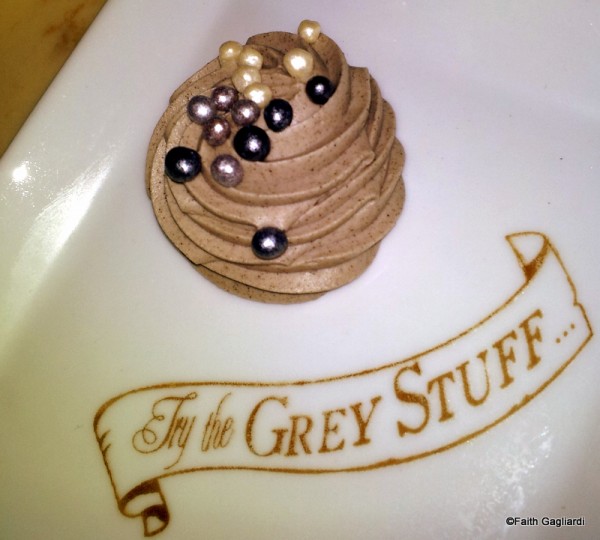
A bit of background: Being the Disney-obsessed person that I am, I somewhat recently was fortunate enough to eat at the brand new Be Our Guest restaurant in Disney World. I'll make one quick note that while we were there, the food was excellent, the service was fantastic, the ambiance was magical, and don't let anyone tell you otherwise. But a dinner review is not part of the story. Since the restaurant was still in grand opening phases, they were serving a special dessert called "The Grey Stuff" which was some kind of mysterious mousse with candy pearls on it. Here's a photo of what the dessert looked like at the restaurant:


(image courtesy of disneyfoodblog.com).

Anyway, it was indeed delicious so obviously I had to seek to recreate it. After poking around on the internets a bit, I found a recipe here. I decided to make this for my already once-cancelled birthday party. My birthday got snowed out this year so I was left with a big ol' cake and very few people to eat it. So instead of cake, I decided to make grey stuff cupcakes.

Now, if I were really dedicated, I would have made stuffed cupcakes. But I was lazy. So there. Anyway, I set off to get the ingredients which basically consist of Oreos, vanilla and chocolate instant pudding, and Cool Whip. And some milk. And edible candy pearls. Oddly enough, I knew that I could get edible candy pearls at AC Moore so after the grocery store, off I went!

[Sidebar: First of all, they only had pink candy pearls because all of the other colors were sold out. Who knew candy pearls were such a hot commodity? I went to pay for the candy pearls (which cost $2.50 with my coupon) but alas, I only had a hundred dollar bill in my wallet. Which is super annoying, I know, but I figured, I have to break that bill sometime. So, long story short, the cashier didn't have change of 100 in her drawer, she had to bring over a manager at which point I just offered to pay with a credit card and by the time the manager had voided the transaction, I had actually dug $2.50 in change out of my purse. I felt so bad being THAT customer causing an obnoxious hold-up. Also, my $2.50 was completely in dimes. Such drama. My supposedly short trip to the store ended up taking about 20 minutes. Whoops.]

Finally I got home to perform the multistep process of making the grey stuff. Started by mixing the vanilla pudding and milk and putting that in to chill. Then proceeded to crush an entire box of Oreos in a food processor. Did I forget to mention that I doubled the recipe? It wasn't clear how much grey stuff the recipe made and I didn't want to run out. Let's just say I had a lot of extra. Meanwhile, I was baking cupcakes. And by baking cupcakes, I actually mean using a Duncan Hines Devil's Food Cake box mix. I know, I know, big fat cheater but you know what? They're good and easy. And I was time pressed because we were also making three pounds of homemade pasta.

Next step was to add in the Oreos and the Cool Whip. I was like an expert folder. I folded in those ingredients like a pro. I only flung a little bit onto my mom's fancy new counters. And all over the food processor (somehow). Last step was to mix in a few tablespoons of the chocolate pudding. Now, in hindsight, I think that I should have stopped before the chocolate pudding. While it might help the taste, the grey stuff was a much nicer grey color before the chocolate. As it was, it turned out a little browner than I would have liked. It was super cool to watch the colors change as I mixed the ingredients though.

Only thing left to do was to make it pretty. I made a nice huge mess piping the grey stuff on top of the cupcakes (I had to refill the piping bag halfway through and my mom's piping bag is super terrible so it makes a mess) but the end result with the pink pearls was gorgeous:


Sorry for the bad picture, I only thought to take a picture at the last minute and only my cell phone was handy. Aren't they pretty though? My piping needs a bit more work and I definitely could have used a wider tip to get the desired effect but again, I was time pressed trying to pipe these immediately following dinner. I actually think the pink pearls look really cute on these. And they tasted AMAZING. The cupcakes were really light and fluffy and the grey stuff melted in your mouth and the pink pearls give you that little extra bit of texture and crunch. Perfection. I would really recommend that people take a chance and try making these. They're so easy and only involve stirring and crushing Oreos. You don't even have to pipe them! I was eating leftover grey stuff with a spoon and it was delicious. And if you don't believe me....well, too bad.

A Disney Moment: Fantasia 2000

Flying whales. Donald Duck. Fantasia 2000 suffers from the same flaws that the original Fantasia had. Namely, it’s uneven in quality, some parts are downright boring, and it lacks the overall cohesion that I think a movie should have. Also, I don’t think there was a need for a reboot of Fantasia. I understand and respect the concept: animate classical and wonderful music to blend the two art forms. It’s not unlike dance in that sense; use visual displays to elevate the quality of and interpret the music. Make it available to the masses. Introduce kids to it. I am all for the mission of getting kids into classical (or jazz) music. I just don’t think Fantasia 2000 accomplishes it as it seems to have been largely forgotten.


Maybe that’s just my impression. And maybe I’m just cranky. But it doesn't grab me. Let’s break it down anyway though, shall we? Ok, I just googled Fantasia 2000 to remind me of the order of the scenes and I read that famous people introduced each segment. I don’t remember that at all. Yikes. We’re not going to break this down by segment because I don’t remember enough to sound informed. It’s such a shame, I used to be good about writing these up immediately after watching and then I got out of the habit and now I don’t remember a single thing. I’ll just go through the stuff I know I liked. I always remember the flying whales and think they’re cool for a few minutes but then I get bored. I love Rhapsody in Blue. I think it’s the best part. I remember the flamingos and the yo-yo and think that that is kind of fun. The Sorcerer’s Apprentice, despite being a classic, always feels out of place in this movie. I don’t know if it’s because we’ve all seen it already, because it’s so iconic, or because it’s awkwardly ¾ of the way through the movie but it always strikes me as jarring in the context of Fantasia 2000. The part with Donald Duck and the ark is ok but not too thrilling. And I think I was falling asleep during the last segment. So it’s a mediocre 3/5. Not really bad, not really good, not really that memorable. 

Thursday, November 14, 2013

Ahhh, A Diversion!

I return with distractions! Disclaimer: I have not yet baked in my new apartment. It's just been crazy looking for a house and getting used to my job and basically adjusting to life. However, I have been doing a couple of crafts including a fit of Pinterest-related insanity last night. So I thought I'd share this with you to give you something to read to procrastinate with. And maybe to inspire you to do something crafty! Also, this post title comes to you from one of my favorite Lord of the Rings quotes of all time. It occurs in Return of the King when Aragorn explains his entire complicated plan for drawing the troops out of Mordor and it's said as a dramatic speech and then the response from our exposition device, Legolas, is "Ahhh. A diversion." Because the audience was too stupid to understand that without Legolas telling us. It cracks me up every time I see it. In fact, let me crack up about it right now. You can join me: http://www.youtube.com/watch?v=bIiUlPrZf8k.

Ok, LotR sidebar over. Let's get to crafting!

This craft is brought to you by Pinterest. I saw this cool pin for a piece of artwork that was nails hammered into wood to create the shape of New Jersey with a heart in the middle and then string going from the borders of NJ to the heart. That makes it sound lame. Anyway, after a little searching, I found someone who had some step by step instructions for building this. The link to the blog is here. Although, I have an intense dislike of Ohio and I barely followed these instructions, I feel the need to credit it. At the very least, it made me feel like it was possible for me to do myself. So, after work, I went over to Walmart to acquire the tools I would need.

Easier said than done. Picture me wandering aimlessly around Walmart trying to figure out how to make this craft. I was supposed to be getting a 12x12 inch wooden board that I was apparently going to sand and paint. False. I also needed small nails, string, painter's tape, and small nail hammer assistants. Lies. First thing I found in the store was the string. I was all like, "cool, red string!" and felt like things were going pretty well so far. Next stop was the nails. I didn't find small ones but I found white ones! So that worked for me. Now, I wanted to find some wood. I didn't want to have to sand and paint wood so I wanted something that was like a wooden plaque that was already finished and ready for me to craft on. How ridiculous of me. That doesn't exist. I toyed with getting a picture frame and taking out the glass and hammering into that but it seemed like a fantastically bad idea. I went though all the aisles of Walmart twice. It's a pretty big store. Sighing and giving up and heading outside, I walked past a random aisle that had a canvas drawer organizer. It seemed pretty thick and of good quality so I figured, what's the worst that could happen?

So I went home, printed an outline of New Jersey and set about my task. Step 1 was cutting out my New Jersey template. This would have been SO much easier if I was from Colorado. Stupid intricately complicated state lines. I did my best but let's just say the barrier islands didn't make it. Next I had to tape down the template on my wood canvas drawer organizer. I oddly enough found some old painter's tape that was barely sticky but it worked. Then I just had to hammer in the nails around the outline. This took a long time and I had some OCD issues with the heights of all the nails being even but I managed. My wrist was a little tired by the end. Then I had to hammer the nails in for the heart. I wanted to put the heart over Nutley but it would have made the entire thing look weird so it's a little more west than it should be. I also had a lot of trouble because the heart isn't that big and it was hard to get the nails in the right shape to get it to look right. Eventually I just called it good enough and moved on.

Then I just had to string all of the nails. I quite enjoyed this task. It's good for people with tiny fingers and a lot of patience and a joy of monotonous activities. So basically, me. I had some struggles because the shape of NJ is really not conducive to this task but I think it turned out pretty nicely. There was an issue with the heart wherein by the time I was done stringing, it looked nothing like a heart. After trying to adjust the nails a bit and failing, I realized that if I just removed the nail that was the top point of the heart, it would look much closer to correct. Tell me what you think:


The pictures don't make it look great, but trust me, in person, it looks fantastic. I really love it. It was pretty easy, it only took about 2 hours and 10 bucks, and my quick fix for having no wood actually really worked. I stood it up on my bedroom dresser and it makes me smile and think of good ol' New Jersey.

So that's your entertaining diversion for the day! Hope you enjoyed! Hopefully I'll bake soon but otherwise I have one other craft I may blog about. We shall see. Maybe this weekend I'll make some brownies....Mmmmm brownies....

Friday, October 4, 2013

It's the Final Countdown!

I’m moving! I’m in shock and can’t believe that in a couple days, my house will no longer be mine. I've been feeling extremely nostalgic, particularly regarding my kitchen because that’s where I started this whole journey! Remember back when I was just a poor grad student with one baking pan and a couple of bowls? I've come such a long way since then. But never fear! I can’t live without my baking supplies so they’re coming with me to my temporary apartment! So you may look forward to future adventures in a kitchen that will be very new to me. I really hope it has an oven with correct cooking temperatures. Now to business: I had to bake one last time before moving. Obviously my last baking experience was great because I was making truffles with my friend but that doesn't have quite the solitary and fumbling tone that mark many of my baking experiences in this particular kitchen. So grab a cup of tea while I tell you about my experience with Martha Stewart’s Earl Grey Tea cookies.

I’ve actually been wanting to make these since before I was a tea addict. Back in the day, I went to London and Ireland to visit friends who were studying abroad. While I was there, my friends served me tea and tea biscuits/cookies. I don’t really remember because it was a while ago but I was really struck by how yummy the cookies were with tea. So, what could be better than Earl Grey Tea cookies? Gotta love my rationale for how I pick what to bake. Plus there was a picture.  Martha Stewart Cookies book is the best.

I’ve been putting off this recipe for a while. One reason was because I didn’t want to buy Earl Grey tea for the recipe and I was formerly a much bigger fan of English Breakfast. I have since seen the light. The second reason was because the recipe calls for orange zest and I never have oranges in my house and rarely think to buy them for a recipe. Yes, I know, I’m weird, I don’t eat oranges. The third reason for postponing the recipe was that I need to grind up the tea leaves very finely with a food processor or a mortar and pestle. I have neither of those things. I kept waiting, thinking that I might spring for a tiny food processor but I haven’t so you get another lovely instance of the baker trying to make do and be creative! Which, I’m sure, is why anyone is reading this

Anyway, this is a fairly simple recipe but is filled with all of the quirks that makes Martha, well, Martha. Step 1: combine flour, salt, and ground up tea in a bowl. Yeah, I never do that combining dry ingredients beforehand part. That just dirties another bowl and I have no time for that. However, I did have to crush the tea leaves somehow. First I should mention that I didn’t use pure Earl Grey tea. I only have really nice Earl Grey and if you thought I was using that for cookies, you were sorely mistaken. Instead, I used one of the teas from my tea blending phase that I believe I mentioned on this blog before. I decided to go with the Statler and Waldorf blend because that’s the most Earl Grey-like (and is quite delicious). It’s a blend of mostly Earl Grey spice and a bit of Earl Grey vanilla. So already I’m tweaking Martha’s recipe. Oh well. Next, I mentioned my lack of any grinding device. I decided to try to make a makeshift mortar and pestle with a bowl and a spoon. This actually worked a little but the tea kept jumping out of the bowl when I crushed it and when a piece hit me in the eye, I decided that we were done with that particular approach. Then I went and got clever though. I put the tea leaves in a plastic bag and just crushed them by rolling the back of a spoon over them through the bag. It worked so well! The tea leaves would make a crunchy noise until they were very finely ground so I had a built-in indication of when I was done crushing! I still can’t believe this worked. You really don’t understand how excited I am.

Step 2 was to cream butter, confectioner’s sugar, and orange zest. Ugh, zesting. I don’t enjoy zesting. It’s not fun. I actually do have a small zester (I have no idea if that’s what it’s called) but my hands are a bit too small to hold an orange securely and I felt like it was so much effort for so little yield. I needed a full tablespoon of zest so once I got annoyed enough, I asked my fiancĂ© to do it. He did a fine job and then I cut up the orange for him to eat. At this point, I was getting a bit flustered by the overwhelming smell of orange in my kitchen. Did I mention I really hate oranges? I mean, I really hate all citrus but orange is the worst. So I creamed the ingredients and started thinking that I probably wouldn’t like these cookies because, even with only a tablespoon of zest, the dough smelled awfully orange-y.

Next was to chuck in the dry ingredients. Now, I was being a bit of a lazy baker. I know baking is an exact science and all that but I was eyeballing the measurements a little bit. For instance, I wasn’t really sweeping the top of the cups of flour with a knife. I absolutely eyeballed how much two tablespoons of tea would be. And I may have just poured in some salt without measuring at all. Now I know what you’re going to say: bad idea. But I only needed half a teaspoon and I’m pretty sure I erred on the side of under-salting so I think I should be safe!

After that (and between scenes in Grey’s Anatomy), I had to divide the dough in half, put on parchment paper and roll into logs that were 1.25 inches in diameter. That’s small, right? Like, really tiny cookies? I didn’t measure so whatever. Martha also advised using a ruler to smooth out the edge as I rolled and to force out all of the air. Perfectionist. I did not do that. Then the dough had to freeze for an hour. Martha recommended putting the dough logs inside paper towel tubes. Do people save those? Should I have had those lying around for just this occasion? Seriously? I just chucked them in the freezer wrapped in the parchment paper.

After freezing the dough, I had to slice the cookies up and throw them on the pans. Martha specified a quarter of an inch thick. That’s a really really tiny cookie! But, I followed her directions. After all, I was supposed to get about 8 dozen out of the recipe. I got maybe 7-7.5 dozen so that’s close enough for me. I was a bit worried about the cooking time and I was right to be because they started to burn a little bit in the first batch. However, I just whipped them out of the oven real quick and they were all salvageable. Look at the tiny delicate cookies!


Now let’s assess what exactly these are. Remember how orange-y the dough smelled? The first thing I noticed once they were baking was that the orange smell had really mellowed quite a bit. They smelled quite tasty. As for the taste, they’re…complex is the only word I can think of. They’re a bit like shortbread cookies so they’re kinda crumbly. But not so crumbly that they fall apart in your hand. But the flavors actually unfold in an interesting way. First you’re hit with the dryness of the cookie. Then you get that hint of orange coming in. Then it actually finishes with a salty kick. Note: I don’t think this is because I put in too much salt! The flavors really just present themselves one at a time. That’s pretty damn complex for a recipe with six ingredients. So I think next time, I’ll make these with just a bit less salt but otherwise they’re a pretty perfect cookie. Martha, you’re a genius. Oh! I almost forgot! I had two of these with a cup of Earl Grey tea this morning and they were a perfect match.

So that’s it for the baking in this particular kitchen! It’s been fantastic and I am going to seriously miss this kitchen, even with its lack of counter space. Thanks to all of those who came to visit to bake with me in the black hole of that part of Connecticut. Onwards and upwards to the next stage of the baking adventure!

A Disney Moment: Tarzan

My sister is afraid of Tarzan. She is super terrified by the jungle cat thing at the beginning. She thinks it is more sinister than Scar or Sher Khan and is afraid of it eating her. This will never cease to amuse me. I saw Tarzan when it came out ages ago. I remember watching Disney Channel and previews on Disney VHS for Tarzan about how they used COMPUTERS! and how they went to skate parks to watch dudes on skateboards and rollerblades doing tricks and stuff so they could simulate how Tarzan surfs on the branches. This is my memory of Tarzan. Other than that, (being somewhat unfamiliar with Tarzan lore) I knew it was about a jungle man and there’s a girl named Jane and she and a dude with a gun try to edumacate and civilize him. I watched this movie several months ago and that’s still all I remember.

Ok, not entirely. But pretty close. So the movie starts out and I’m all like “Dude, there’s a shipwreck?” Meanwhile, my sister is legitimately cowering under a blanket. I have no idea what she’s afraid of. Then there’s craziness like a big jungle cat and parents getting pretty violently murdered and fire and it’s just insane. Just another example of Disney tugging on our heartstrings by shamelessly murdering parents.


I remember things like trashing the camp and the neurotic elephant and the really obnoxious Rosie O’Donnell monkey but other than that, ugh. Something about the movie just doesn’t work for me. It’s sort of a movie where things are happening but it doesn’t feel like anything happens. I do like the song “You’ll Be in My Heart” quite a bit but the things I enjoy about the movie end there. Oh, I also respected the pretty graphic hanging of the villain. This is a super violent movie. I really dislike the angular animation style, particularly on Tarzan. I know it’s supposed to be all revolutionary but his feet are totally deformed! I mean, seriously. I can’t get behind this movie. I know some people think it’s one of the most beautiful movies but it’s just not my style. I prefer the good ol’ hand drawn stuff. All that and it is not even the worst of the batch! So it ranks a 4/5 and sinks happily back into obscurity in my memory. Tarzan lovers: bring it on, I can take it. 

Thursday, October 3, 2013

Team Truffle

Welcome back friends! I was a little slow on this blog post since I’ve already started my brand new, shiny, awesome job that currently comes with a 1.5 hour commute each way. In case you were wondering, that commute makes you very tired when you get home and you just don’t want to blog. But here I am because this was a super fun one. Before my grand departure from UConn, I decided that I wanted to make a treat to give my advisor. So, I decided that truffles would be perfect (mostly because I’ve been wanting to make truffles again) and I invited my friend over to help me with the truffles. Because it’s fun. Now, I could have just made one type of truffle and called it a day. But that’s not fun, nor is it insane. Instead we decided to make four types of truffles: Ebony and Ivory (which you may recall from the last time I made them), Oreo, Caramel, and Cookie Dough (which was my very first baking adventure that I blogged about!). Two repeats, two newbies, and a whole lot of chocolate! 


We started bright and early and spent a fair amount of time trying to decide on a good strategy. Then we gave up and just dove right in. Now it’s been a while so I may get the timeline wrong but I’ll give it a shot. I believe we started with the cookie dough ones so we could eat some cookie dough. Always a good plan. Plus they had to refrigerate for a while before being dipped in chocolate. I love how easy those cookie dough ones are. The only downside, of course, being the process of can opening. The recipe calls for condensed milk and I always forget how thick that is and try to use the poke-a-hole type of can opener instead of a legit one because I’m lazy. So yeah, it made a bit of a mess. But otherwise, it was super duper easy. We got our hands nice and dirty rolling them into balls but it was delicious so who cares? We threw them in the fridge and were amazed that with two people, the process only took about half an hour.

Oh! Now I remember how this actually went down! Ok, you see how I painted this lovely picture of us doing one thing at a time? That’s TOTALLY not how that happened. Before we started anything, we attacked the caramels. We had to unwrap about 26 of them and caramels (in case you didn’t already know) are kinda sticky. So that took a while. But the reason we did this first was because for the caramel truffles, we had to melt the caramels together with the chocolate, pour into a pan, refrigerate, then slice and roll into balls, and refrigerate again. Once all those suckers were unwrapped, I got to melting them on the stove while my friend started the cookie dough truffles. It sort of feels like we were both doing everything though because she needed help finding things in my kitchen (which is not organized logically at all) and I needed help with things like noticing that the caramels were practically boiling. Whoops. I get easily distracted. So the cookie dough and caramel ones wrapped at almost the same time. I have to compliment the author of the caramel recipe for the cool trick of lining a pan with plastic wrap, pouring the caramel mixture in and then just flipping them out after they cool for cutting and rolling. It was actually easy. Oh, I should mention that this recipe comes from my very first baking book, the Taste of Home Best Recipes 2010 cookbook. I missed using that book. It’s got such cute ideas.

For round two, we decided to divide and conquer. My friend was in charge of the Oreo truffles so I can’t really comment on those besides saying that they’re super delicious. I was in charge of the Ebony and Ivory truffles from the Death By Chocolate cookbook. If you recall, the last time I tried that one, my kitchen ended up covered in chocolate, I used the wrong chocolate, and I broke a whisk. I was endeavoring to avoid that this time. I was moderately successful. The first thing was that I actually used the correct type of chocolate. Then I did the whole boiling cream and using it to melt chocolate thing. This time I actually had metal bowls and didn’t have to use Pyrex bowls (which kinda don’t conduct heat). The cream melted the chocolate much better than last time but still needed a little help so I just put the bowls on top of the still-hot burners. I have an electric stove so the residual heat was just enough to finish the melting. I won’t get into the details of the timing of stirring, sitting, refrigerating, and all that because I already discussed that last time but suffice it to say that I set timers and was very careful to not screw it up. It went much better than last time but there was still the issue that on the last stir, the ebony part of the chocolate truffle got pretty hard and tried to break my whisk. I think the timing is just slightly off and maybe the last refrigeration period should be eliminated.
Anyway, at this point, my friend was done with her Oreo things for a bit so she helped me with rolling the truffles. Alas, same problem as last time. The white chocolate is still super oily and sticky and it made our hands a mess and made slightly deformed truffles. But we got it done pretty quickly and once they were rolled, we chucked them in cocoa so that hid the ugliness. Voila! Complete.

After this, there was more chocolate melting but it was all a bit of a blur. I was in charge of cutting the caramel truffles and rolling them into balls. However, I noticed that if I was moving too slowly, the balls started to flatten out. So I rushed through rolling them and tossed them in the fridge thinking that the coldness would slow the process. A few minutes later, I checked on them and they were all pretty flattened. My friend and I tried to reroll and fix them but we were just not quite fast enough and they ended up as disc-like truffles. Bad physics. Very bad physics.

The final step was dipping the cookie dough balls in chocolate. I was tired of melting chocolate so I pulled some ultimate ganache out of the freezer and melted that and dipped the cookie dough balls in that. And by “I”, I totally mean my friend who got really good at using spoons to dip the balls so that they looked neat and tidy and didn’t make a big mess.

So there we were, looking at four pans of truffles. They looked depressingly ugly to be honest. But we were proud that we made four types of truffles within about 3 hours.  The truffles still had some more refrigerating to go and my friend had to leave so I was in charge of packing them up and delivering the next day.


 Never underestimate the power of a good candy tin.

As ugly as these looked on the pans, they looked downright professional once they were put into candy tins in an assorted fashion. We could probably sell these for at least ten bucks a tin. So I put together a bunch of tins of truffles and they look lovely:


As far as the taste, shame on the baker because I still haven’t tried them all. I ate several of the Oreo ones (which are fantastic) and a few of the cookie dough ones (which are also pretty darn good but too sweet to eat more than one at a time). I just tonight tried one of the Ebony and Ivory ones. They're super delicious on the inside but I think that the cocoa on the outside is just a little bit too bitter. It'd be better with a thin milk chocolate coating I think. The inside is just top notch though. I haven’t touched the caramel ones. They’re still in my fridge. My fiancĂ© tried them and informed me that the caramel ones are good but very hard because, duh, caramel. Shrug. I just haven’t been craving chocolate lately. I’ve been pawning them off to anyone I can think of including my chiropractor and friends that invited us over to dinner. Oh well. The moral of the story is this: Baking with friends is much easier and much more fun and you don’t have to be a professional to make some pretty professional-looking treats.

No Disney Moment this week. My sister and I are still trying to summon the will to watch Brother Bear. Once we do, I’ll have enough material for rankings I think. By the way, be on the lookout for another post really soon. It’ll be my last time baking in my kitchen before I move! Madness!

Tuesday, August 20, 2013

Just Like Riding a Unicycle

I have returned! I'd apologize to my readers but life has just been insane this summer so you get no such apologies. Since you last left your hero, she has baked exactly once. And the only reason for that was the necessary baking of crumb cake to bribe dissertation committee members to let me get my doctorate. Fun fact: it worked! Another fun fact: you can totally write a dissertation in one summer. It just requires a lot of support and a lot of coffee. So anyway, between the getting a doctorate, getting engaged, and trying to sell my house (which means that my KitchenAid mixer is neatly hidden in a closet instead of out on my counter begging me to bake) it's been hard to find the time to bake. Good thing that the one instance of baking was an adventure and a half!

My grandmother makes delicious crumb cake. I mean, it's just out of this world. So I decided that for my dissertation defense at 10:30 am, I would provide this delicious crumb cake for my committee. I got the recipe from my grandmother on an adorable recipe card and embarked on a journey in which I realize that I've forgotten how to bake. Also that I can't really do math. So here's the problem: the recipe calls for a 15x10x1 inch pan. However, I wanted to use a disposable tin pan so that I wouldn't have to worry about cleaning up after my defense and that size isn't made in the disposable pans. Now picture me standing in the supermarket trying to figure out what size pans I could use to get the appropriate area if I doubled or tripled the recipe. I kid you not, it took about 8 minutes of me standing there. Eventually I figured out that if I doubled the recipe and made 3 crumb cakes with a particular size (I forget which) then I would be pretty close. No problem, right?

Problem. I always forget that doubling affects things like the size bowls that I need. The key to this recipe is that you actually use boxed cake mix but you modify what is added a bit. Actually, you really just substitute sour cream for the water that's called for in the recipe. It makes the cake extra moist and unhealthy. Things actually went fine with the cake part because I used my biggest bowl so there were no issues. Meanwhile, once the cakes were in the oven, I had to go about making the crumb topping. Naturally, I chose a bowl that was too small so that led to some very very careful stirring. But more importantly, I forgot how to do some very basic things.

First of all, I ran out of flour. Now, I know I've said before "Who runs out of flour?!?" but it happened to me again. I guess I underestimated how much 7 cups of flour is. So I sent my (at the time, not quite) fiance to the store to get flour with the direction "just get regular, unbleached flour." I figured I could trust that. While he was out, I set to the task of melting the butter for the crumb. I don't know what sort of stroke I was having at the time but when I tell you that I chose my smallest Pyrex bowl to melt 6 sticks of butter in, I can only wish I were kidding. My logic here was "when it melts, it takes up less space!" Yup. Flawless logic. I should also point out that melting 6 sticks of butter in the microwave takes a long time to do. And no, I don't know why I didn't just melt it over the stove. That would have been smart. So after a lot of time and a lot of mess, I ended up with a bowl of butter that was just barely under the rim of the bowl. Also, it made me realize just how unhealthy this cake is.

As I'm pouring the butter into the crumb mixture, the boy returns triumphantly saying "I asked at the store which flour is best for baking and the person said to get this one!" It's whole wheat flour. I know enough about baking to know that whole wheat flour is not a 1-1 substitution for regular flour because of the gluten content. Basically it behaves differently. And makes cookies really crunchy if you substitute which I've never EVER done before. Of course. Anyway, since I only needed a cup and a half of the whole wheat flour, I decided to go ahead with it because it was only for the crumb.

When you're making the crumb topping, pretty much you mix the melted butter with the dry ingredients until crumbs form. The only way to make this happen is to get your hands dirty. But that's ok because it was sort of fun! I mashed the ingredients and rolled them between my fingers and made a big mess but eventually, I got crumbs. Then I stuck them on top of the three cakes (of course making another mess in the process) and made sure I had a somewhat thick crumb layer. It could do with being a little thicker though. I think my conversions were a little off somehow. Anyway, I baked them up and since there were three cakes, got to keep one for myself to taste. The pictures sadly don't have the powdered sugar on them but since I was making these in advance, I was actually very professional and brought bagged powdered sugar and a sieve to sprinkle the final touch on right before consumption.


This cake is so delicious. I just love it. The cake part of it came out a little crumbly and fall apart-y and I'm not entirely sure why that happened but I'll take that over an awful dense cake. And carefully wrapped and stored in the fridge, the cakes were still very moist and delicious when I brought them to my defense three days later. So I sort of forgot how to bake efficiently but I had a lot of fun doing it. It's been so long and I was just that much happier when I was finally baking.

One final anecdote: Here's why you always bring baked goods to a dissertation defense. During the private grilling portion of the defense, Professor A said, "You're doing great, I just have five more questions to ask you." Professor B jumped in with, "Five more?! There won't be any crumb cake left!" To which Professor A responded, "You're right! I have two more questions to ask you." Statisticians really love their sweets.


Wednesday, May 8, 2013

And That's Why You Always Bake Before Finals

Hey guys, you know what's better than taking classes? NOT taking classes! It's currently finals week in the most baking-free semester known to mankind. But now the semester is ending and that means there's time to bake again! Even though I wasn't taking any classes (and thus have no finals to take to stress out about), I did spend this semester teaching a course for the first time ever. That's right, I'm mad with power. Therefore, the only thing about finals week for me to worry about is giving my students an exam.

Now, let me give you some background on why I'm baking before giving a final exam. UConn has switched its course evaluation system to an online system. Two friends and I postulated that this would mean a lower response rate than the in-class paper evaluations (which is the opposite of what UConn seemed to hope to achieve besides the whole saving trees thing). We subsequently made a bet that whoever got the lowest response rate pre-bribery would have to buy lunch. Pre-bribery, I didn't lose. Then we decided to add bribery to the mix. I told my students that I'd bring cookies to the final if I won the bet. Well, I didn't actually win, but I didn't lose either. So I'm bringing cookies anyway. Because I'm nice. And frankly, I'm happy to be done with teaching and this is as good an excuse as any to bake!

I have no time nor energy to actually challenge myself tonight so I went with the old standby: Nestle Toll House chocolate chip cookies. No nuts, no fuss, just good ol' chocolate chip. Because who doesn't need a nice chocolate chip cookie after a really challenging exam an exam that fairly tests all of the material covered. I decided to make a double batch because I have 40 students and people who have been craving my baking for a while now. So according to the chocolate chip package, that would be 10 dozen cookies! Sounds about right.

There's something so calming about baking. I can't quite describe it. But even when I'm gabbing on the phone with my sister and adding the ingredients, it just starts to put me at ease. Anyway, it's been so long since I made these, I initially couldn't remember how many sticks of butter went in. Other than that though, things went smoothly aside from one really stubborn egg that didn't seem to want to crack. The shell cracked but the membrane wouldn't break! So weird. Also, I was reminded of the time when I was shopping with my mom Santa for my KitchenAid mixer and was discussing what size to get. And I remember saying, "I'll never need that bigger one, that's ludicrous! When would I ever be making that many cookies?" Yup, now is when I could've used that bigger one. The dough was practically spilling out of the mixing bowl. Whoops.

This is a short blog post because there's really nothing to say about chocolate chip cookies. But it is good to be back in the kitchen. Here's a small sampling of the huge number of cookies I'm baking:


They're delicious and they came out perfectly (seriously, I didn't burn a single cookie. They are ALL perfectly baked!) and I can't wait to share them with my students and friends. It's good to be back. And if any of my students are reading this right now, GO STUDY!